Pages

Tampilkan postingan dengan label seat. Tampilkan semua postingan

Sabtu, 21 Januari 2017

Seat Blocking Kind Words and a Testimony

Seat blocking & angle finder


My planer / jointer & a bunch of shredded mahogany

Seat Blocking?
Yesterday, I made the 2 pieces of blocking that will go under the ends of the rear thwart. Thanks to my angle finder, I knew the bevel on the blocking needed to be 15°. I cut that bevel by adjusting the fence on my planer / jointer, and running the pieces of mahogany (roughly 12” x 2” x 1” each) over it a few times. Everything looks like it should fit just fine. I’ll trim the pieces of blocking down about a half inch or so, before actually installing them. 

The next step will be to remove the seat and attach some reinforcing pieces to the bottom, in an effort to straighten out the slight bend in the plywood. 

Kind Words
?Earlier in the day yesterday, I had attended a funeral mass for a friend’s mother. I’m not very familiar with Catholic services, and I was sitting in the back with others who weren’t really sure when to sit, stand, or what words to repeat. Some people can feel pretty uncomfortable about that, but I find the awkwardness a little fun. Some of the rituals of the mass were similar to Episcopal services I’m more accustomed to, so it wasn’t entirely foreign to me. But ultimately, such ritualistic expressions are not the main point. “Religiousness” and “faith” are two entirely different things. 

That was on my mind as I walked through the narthex, greeting old friends… many of whom I haven’t seen in a long time. One of them, who knew a bit of what I’ve been through as far as divorce, heart surgery, and other things, spoke the kindest and most affirming words to me that anyone has ever spoken. I was entirely humbled by the man’s eloquence and consideration. I was not worthy of it. 

What totally floored me was when he said that, whenever he faced difficulties or hardships in his own life, he thought about me; that in doing so, he found inspiration in separating what really is, and what really is not, worth worrying about. I was speechless. I was even more speechless when he gestured toward the altar, with the crucifix on the wall above it, and said that he had no use for the supernatural, but instead found inspiration in other people. I understood, because I knew that my friend is a devout atheist… Just as I professed to be for the majority of the time he & I have known each other. 

What changed? 

I thought of the words of Peter: “Be prepared to give an answer to everyone who asks you a reason for the hope that is in you.” All I could do was gesture back toward the crucifix on the wall. 

A Testimony
Don’t worry. This is a boatbuilding blog, and not a platform for proselytizing or shoving religious agendas in anyone’s face. Of all people, I completely understand how irritating that is. I just wondered, how would I share with my friend who I admire and respect, the reasons I had gone from sharing his very same viewpoint to the one I hold now? 

For one, there is this: Most atheists I know are very sensitive to notions of right and wrong, and are almost all advocates of kindness and social justice. From a humanist standpoint, I began to ask myself, “Where do all these sentiments of knowing good from bad, right from wrong, come from? How and why are these sentiments so innate in most people?” 

You may have also heard the expression “there’s no such thing as an atheist in a foxhole.” True enough… when most people are pushed to points of absolute desperation, why do they say phrases like “please, God… don’t let this be.” Is it only an expression? If so, why is it so instinctive, even for the non-believer, in those most desperate moments? 

Also, I began to question why I had such a disdain for religion. After a lot of honest self-examination, I realized that I truly did not have a problem with a God… if there was one. Instead, I had a general disdain for “christians.” You know — those hateful, rude, self-righteous people who express their moral superiority over everyone else & tell the rest of the world they’re going to hell. Those people. 

I have come to believe that “those people” with “that attitude” have done FAR more to alienate people from faith than they have done to share it. 

So, at a point in one of my darker moments during the early stages of my divorce, I made a decision. I decided I would discard EVERYTHING “those people” EVER told me about God. I decided to discard every sermon, from every denomination…. every shaking, judgmental finger that had ever been pointed at me. I jettisoned it ALL. 

I realized that, throughout much of human history, during times of the most corruption and evildoing in the name of God, “the church” held the power of one particular point of leverage over common people: Literacy. 

Much of human history has been filled with unwritten, average, everyday people who could only dream to read. These people had to rely fully on “the church” to explain the words of the bible. With the power of literacy and the fear of a wrathful God in their hands, “the church” gained an almost absolute power over common people. 

Today, we largely take literacy for granted. I realized that my impression of faith had largely been based on what I had seen and heard from “those people,” and NOT what I’d read for myself. My impression of faith had also been formed by things I’d heard and read from vociferous opponents of religion, and what THEY had to say about the bible…. NOT what I had read for myself. I had absorbed everyone’s opinions but my own. Maybe it had just been easier that way. 

In any case, I decided to change it. 

I discarded everyone else’s interpretations, explanations, and opinions of the bible. I bought one, and simply began reading it. It was a turning point. 

Have a great day.
Read More..

Sabtu, 24 Desember 2016

Seat blocking epoxys love affair with tape

It has been a busy week with band rehearsals & back-to-school shopping, but last night I did manage to get the blocking for the rear seat attached.

I had covered the ends of the seat with blue painters tape in an effort to keep from gluing the seat down just yet. In short, it worked. But, after I had pried the seat off of the blocking, I was reminded that epoxy really likes blue tape. Epoxy likes blue tape a lot.

Thats a mess to clean up another day.


16 clamps to install 2 pieces of seat blocking? Yep. Some to clamp the seat to two levels; some to clamp the seat to the center support; some to clamp the blocking to the seat; and two used as spreaders to push the blocking upward & outward.


The larger Irwin bar clamps are great, because you can switch them around & use them as spreader bars.

Port side blocking attached.

Starboard side blocking attached.

No, I wont win any prizes for fit and finish. (Im not trying to.) Even with the imperfect fit, the thickened epoxy is tenaciously holding the little mahogany block to the side of the boat.

I can fill in the remaining gaps with epoxy when I encapsulate the inner surfaces of the hull.


Read More..

Selasa, 11 Oktober 2016

Laminating the front seat More painting

I decided to start working on the forward thwart. Both thwarts are cut from 22/32" AC exterior-grade plywood. My plan is to laminate 1/4" Meranti plywood onto the top, so that the seats will match the deck and the transom.


My original plan was to stain the sides of the lighter-colored AC plywood. However, Ive changed my mind & now plan to paint the sides Sea Foam Green to match the accent color on the sheers.

The forward thwart is 12" long x 45" wide at the base. (The sides are bevelled, so the top is wider than the bottom). Luckily, I had a piece of Meranti large enough to use, so I dont yet have to cut into one of the remaining sheets.

I cut out the middle section of it, arranging it so that it will have an attractive grain pattern showing on the top of the seat.

Grain pattern for the forward thwart.

Then I turned it over and coated it with epoxy. I coated the mating surface of the AC plywood thwart with epoxy, and stuck them together. Since the whole thing was laying flat, with flat mating surfaces, I did not use thickened epoxy. I weighted the thwart down with concrete blocks and a paint can to get good adhesion.

I set the whole thing on waxed paper to avoid accidentally gluing it to my working surface.

With the remaining epoxy from the batch, I added a 2nd layer to encapsulate the aft section of the boat. I got the port side done before I ran out of epoxy. Once it cured, it was ready for paint.

Half of the aft section with 2 layers of epoxy.

Once the epoxy on the thwart cured, I put the whole assembly in my bench vise for further work.

First layer of Whidbey White painted in the aft section.

Cleat removed from the port quarter knee; quarter knee taped off, and more paint applied to the back.


A light frosting of paint on the underside of the thwart.


A third coat of Whidbey White on everything but the transom.


Read More..

Rabu, 28 September 2016

The seat support turned out great

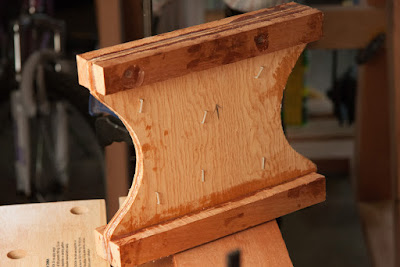
I was very pleased with how the center support for the seat went together. I wanted it to be 1/2" plywood, which I did not have on-hand. So, I cut two pieces from 1/4" marine-grade Douglas Fir plywood, with the intention of laminating them together.

Plywood parts, cut from the poster board template.

Plywood parts, cut from the poster board template.
Once I had all the parts cut, (two 1/4" plywood supports, and 4 pieces of 1" x 1" mahogany blocking), I glued them all together with thickened epoxy. The Raptor stapler I bought last year once again proved perfect for holding the plywood parts together while the epoxy cured.

The plastic Raptor staples were perfect for holding the plywood pieces together.

Seat support, prior to being sanded & planed.
After the epoxy cured overnight, I sanded the edges smooth, and snipped and sanded the Raptor staples. These staples sand away very easily, and virtually disappear. No need to pull them, and fill the holes... just leave them there.

Then I ran the top & bottom surfaces over a planer/jointer, and it was ready for the next step.


The sanded & planed seat support, sitting in its position on the keel.

The sanded & planed seat support, sitting in position n the keel.
From that point, it was time to cut the seat. According to measurements, the front edge of the seat needed to be 49" wide, and the back edge 47.5". The side edges needed to be cut at a 15° bevel to match the sides of the hull.

So, I drew and cut it from a piece of A-C exterior grade plywood I had on-hand. With a little minor fitting, it set into place just as well as Id hoped.

Seat cut from A-C exterior grade plywood.

Seat cut from A-C exterior grade plywood.


Without intending to, I cut the A-C plywood "ugly side up" (the C side). However, that wont really matter. My plan is to laminate a piece of the BS1088 Meranti plywood on top, so that the seats will match the transom and deck.

The next step, however, is still to fit the blocking on each side of the hull to support the seat at the ends.
Read More..

Minggu, 18 September 2016

Its the little things

A caveat with this design.  Most of the instructions for building the basic hull are densely packed on the hull assemble sheet.  I did not do a couple of things correctly, and had to spend time correcting later.

1.  taper the stringers on the sides.  If you dont you will have problems when you stack and tape the panels
2.  Shape the stem BEFORE you unfold the butterfly.  You will get a nicer line.  My forefoot is too straight so is not as pleasing aesthetically.
3.  Get a helper when you unfold the panels,  this will limit breakage and surprises.
4.  Read, read, read.  I think I will put together a better punch assembly key step by step to help with the build of another.  It is not a difficult boat to build, but attention to detail is important.

Here are some pictures of the beginning of fitting the frames.  The center one is temporary.  The others get wired in for gluing.  Only after I am satisfied that all in in alignment will I epoxy any seams.


Read More..

Selasa, 06 September 2016

Seat bulkheads

I finally realized that with the temporary center  bulkhead in place, aligning the seat bulkheads was very easy.  Shape them, then temporarily screw to the bulkhead while the glass and tape set up on one side.  I will remove the temp bulkhead this week and finish the seat framing.  


In preparation for setting the centreboard case, I decided to put the seat framing in to help line things up.  Interesting problem in that striking a line 16.25" off the centerline from the forward bulkhead to the stern bulkhead was more difficult than I thought. It actually took me three tries to get a line that measured correctly from stem to stern.  

This got easier when I cut access slots through the temporary bulkhead, then ran the lines through the slots and up to the bow.  I made a wooden measuring device 32" wide and marked the center.  Then I ran the lines up both sides keeping the tool centered over the C/L.  This looks good to me.  
Next, I made a template from some cardboard and transferred the lines from the plans onto the cardboard, then cut and fit the boat with a little trimming and filling to make it all look good.  I have now glassed in one side of the bulkheads and will remove the temporary bulkhead after the epoxy has set.  

Hope to get the framing in place next weekend, and perhaps the seat chambers constructed.  This will help me get the Centreboard case level and positioned correctly.  

the thing sticking up from the bulkhead top is a spring clamp that I use to hold the roll of glass tape for easy access.  

I realized that the lines I put on, were actually 16" off the centerline, that would be to the outside face of the plywood.  The framing needs to be at 16.25" off the centerline. Easy to fix. 


Read More..

Sabtu, 23 Juli 2016

1 seat attached 1 seat coated Primer finally on sheer

Well, the title kinda says it all. So, lets get right to the pictures:


Here is the trimmed rear thwart, waiting for its first "finish" coat of epoxy on top. The plan was to mix some epoxy, coat the thwart using a thin foam roller, squeegee it, then thicken the rest of the epoxy with silica for attaching the forward thwart permanently.

I taped off areas on and around the forward thwart, to both mark where to place thickened epoxy and to make clean-up go more smoothly.

As you can see, there is a considerable gap between the thwart and the side of the hull on the starboard side. The gap is several inches long & gets progressively wider aft. The joint at the forward edge is considerably better. I knew it would take big globs of VERY thick epoxy to fill this gap.

The gap on the port side wasnt so bad.

First epoxy coat rolled & sqeegeed onto the aft thwart.

Heres that big gap filled with thickened epoxy. Before removing the tape, I used the curved corner of the squeegee to shape the epoxy edges.

Improvised bracing to help make sure the thwart was pressed down solidly and level.

Improvised bracing to help make sure the thwart was pressed down solidly and level.

I wanted to get a photo of this filled gap before I painted over it. This is from where I had to remove some material from the corner of the outer sheer lamination in order to get it to bend into place. I removed a little too much, leaving this gap. During installation of the sheer, I heaped on the thickened epoxy in order to fill it. This is the port side joint between the sheer and transom.

First layer of the AquaGard 190 primer on the port sheer.

First layer of the AquaGard 190 primer on the port sheer.

First layer of the AquaGard 190 primer on the port sheer.

Read More..